


6 New Spring Polishes You’ll Want to Wear All Season Long
March 15, 2017
What’s that we smell? A hint of daffodils in the air? The sweet coconut-scented sunscreen you’re packing for your spring break vaca? A little something else wafting in the air at Coachella and other hipster festivals? A change of season is in the air. And lighter, brighter weather means lighter, brighter nails (we hear that even dark polish loyalists take a hiatus from the monotony of black manis come March). Trust us, once you see this season’s prettiest sun-drenched hues, you’ll never want to take them off. Here’s how to wear them solo or if you’re up for some seriously pinterest-worthy nail art, courtesy of celebrity nail queen and Essie artist Rita Remark.
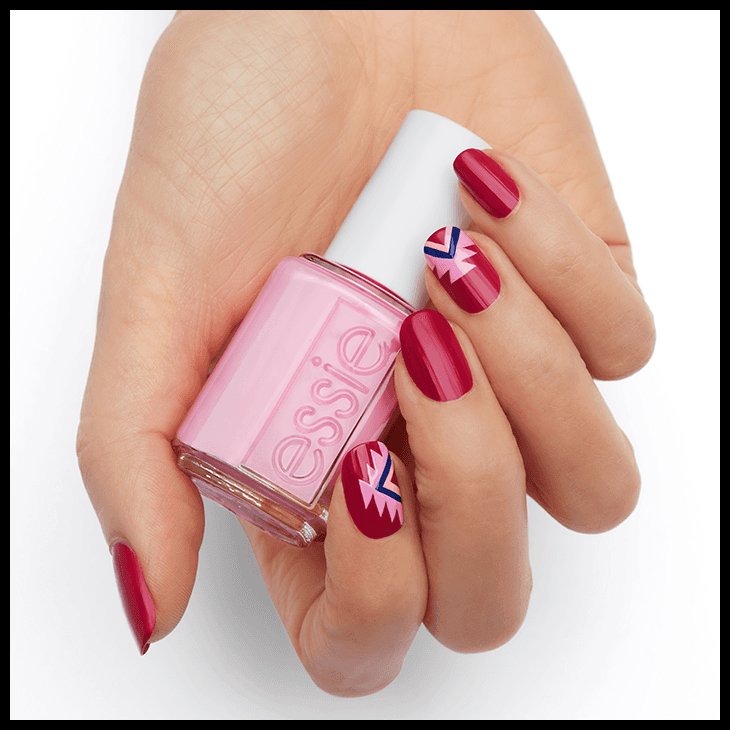
Essie B’aha Moment!
The true hue:
Think bubble gum pink meets magenta meets pomegranate for a fun, girly pop of color
Nail it with nail art:
Festival Flair (see above image)1. After a thin layer of First Base base coat, apply two coats of B'aha Moment! Allow it to completely dry.
2. Using a striping brush, create a "V" shape on the side of the accent nail using a light pink like Backseat Besties. Let dry.
3. Add small triangles along the top and bottom of the "V". Let dry for 1-2 minutes.
4. Add a smaller "V" on the inside of the first using an indigo blue like All The Wave.
5. Add a still smaller "V" using a coral like Excuse Me, Sur. Then seal withGel.Setter top coat.
Rita’s tip:
Create one accent nail with the design on the side of the nail, and another at the tip.
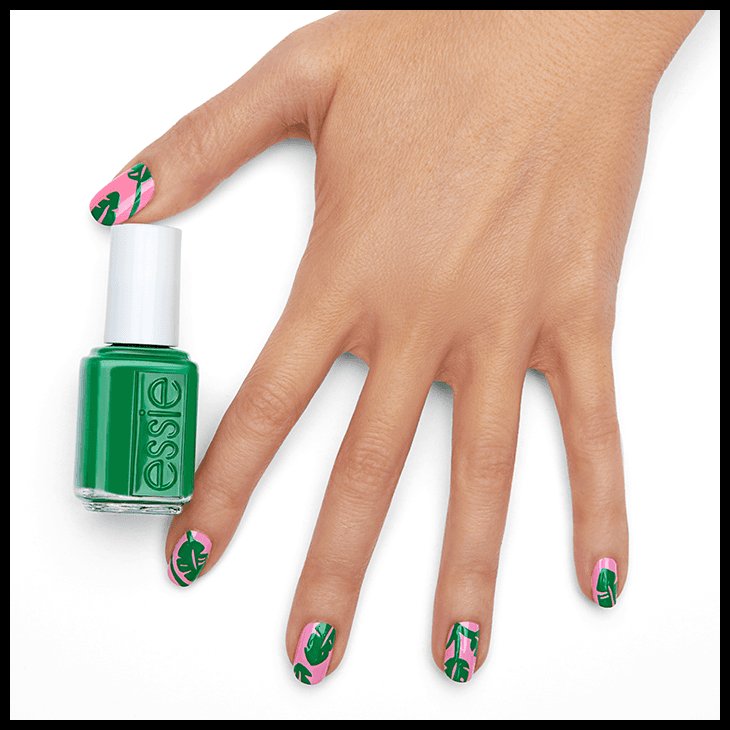
Essie On The Roadie
The true hue:
A vibrant Kelly green with ripe avocado undertones
Nail it with nail art:
Palm Reading (see image above)1. After a thin layer of Ridge Filling primer, apply two coats of a warm pale pink like Backseat Besties. Let polish completely dry.
2. Using a detail brush, create leaf designs with On The Roadie.
3. Begin the leaf pattern by polishing the stem with a curved line. To create the bird of paradise palm leaf, polish a tapered oval outline first, making sure to leave the distinctive cut-outs. When the outline is complete, fill it in. Let polish dry for 2-3 minutes.
4. Seal with Call It Even top coat.
Rita’s tip:
Rinse your brush frequently in polish remover to keep this design crisp and clean.
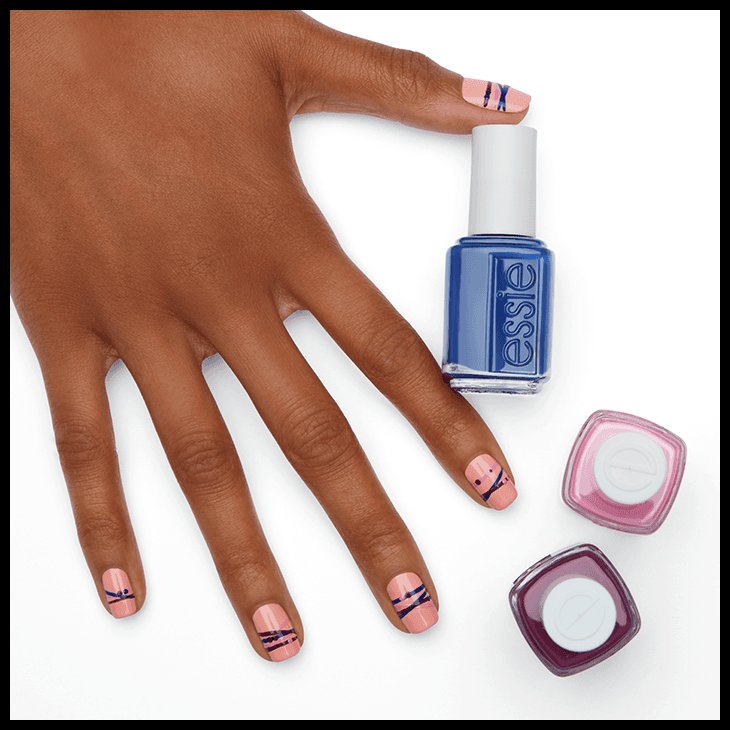
Essie Excuse Me, Sur
The true hue:
A creamy sun-kissed coral mango that looks sweet enough to eat
Nail it with nail art:
Arm Candy (see image above)
1. After a thin layer of Ridge Filling primer, apply two coats of Excuse Me, Sur. Let polish completely dry.
2. Using a striping brush, apply 2 horizontal lines of light pink, like Backseat Besties, across the nail at a slight angle. Let dry for 1-2 minutes.
3. Add a line of indigo blue like All The Wave, crossing the first lines. Let dry for 1-2 minutes.
4. Add 2 lines of a purply plum like Designated DJ.
5. Create “beads” with the same purply plum (try designated DJ ) using a dotting tool, then seal with Good To Go top coat.
Rita’s tip:
Play with different angles and dot combinations to create a unique pattern on each nail.
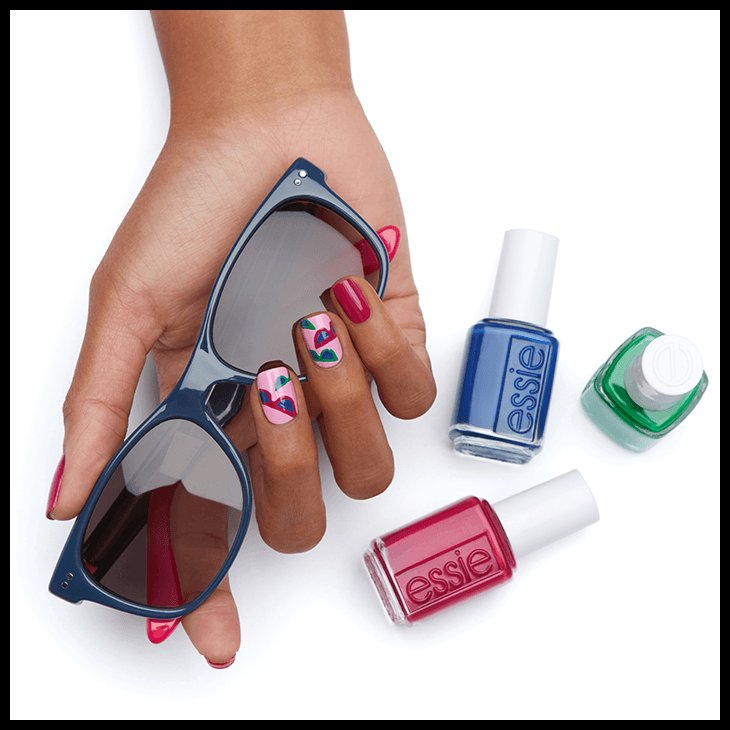
Essie Backseat Besties
The true hue:
A delicate, oh-so-pretty pink plumeria so feminine it makes us blushNail it with nail art:
Retro Specs (see image above)1. After a thin layer of First Base base coat, apply two coats of Backseat Besties on the middle and ring finger nail of each hand, and a darker fuschia pink like B’aha Moment! on the thumb, pointer, and pinkie nails. Let polish completely dry.
2. Using a detail brush, create sunglass frames on the middle and ring fingers with a juicy green like On The Roadie and B’aha Moment! Start with one horizontal line and add two half circles to form each sunglass shape. Let dry for 2-3 minutes.
3. Fill in the sunglass frames with a dark blue like All The Wave. Let dry.
4. Seal with clear top coat.
Rita’s tip:
Rather than dipping your detail brush directly in the bottle, which can gather excess polish, put a few drops of polish onto a disposable palette (or piece of aluminum foil) for a precise amount.
**Tell us what your favorite nail art design is in the comments below!